Springwell water filtration systems have a simple installation process. In contrast to other competing brands, Springwell water filtration systems do not come pre-assembled. Learning how to install Springwell water system shouldn’t be too difficult if you have any prior experience working with tools.
If you are inexperienced with tools, it is best to hire a professional who can handle any plumbing issues that may emerge. So, let us dig into the details of Springwell filter’s installation
How to install springwell water system?
Springwell’s Whole House Filter is available for roughly $150 with the addition of quick-connect fittings. So if you’re interested in trying to install it yourself, that’s good news. Because of it, this is one of the simplest whole-house systems to install because no complicated plumbing fittings are required.
What contents are included for installation
As per the installation teachings, these are the method contents:
- Carbon filter tank
- Tank head
- Pre-filter
- Sediment filter
- Gasket and lube
- House bib assembly
- Bypass valve
- Spanner wrench
- Mounting bracket
- MNPT fittings (x2)

The Procedure for Mounting the Head Valve
- The top of the huge media tank must be unscrewed.
- Push down on the head valve until the opening lines up with the pipe within the tank. To close the valve, turn it clockwise until your hand feels a tight seal.
Carbon Priming
- Put the bypass valve on top of the valve and make sure it’s nice and snug.
- Make that the MNPT fittings are securely fastened onto both bypass ports.
- Connect the hose bib to the bypass valve’s intake port.
- Let’s hook up a hose to this faucet.
- Turn off bypass mode.
- You’ve filled the tank to overflowing if water is now escaping the opening in the bottom.
- You need to unplug the hose from the hose bib.
- To soak the tank for 48 hours, turn the bypass valve to the on position.
Carbon Venting
- Shut off the bypass.
- Just reconnect the garden hose to the inlet port of the bypass valve and tighten the hose bib.
- Clear the tank by flushing it with water.
- Connect the hose to the bypass valve’s output and run the water until it’s clear.
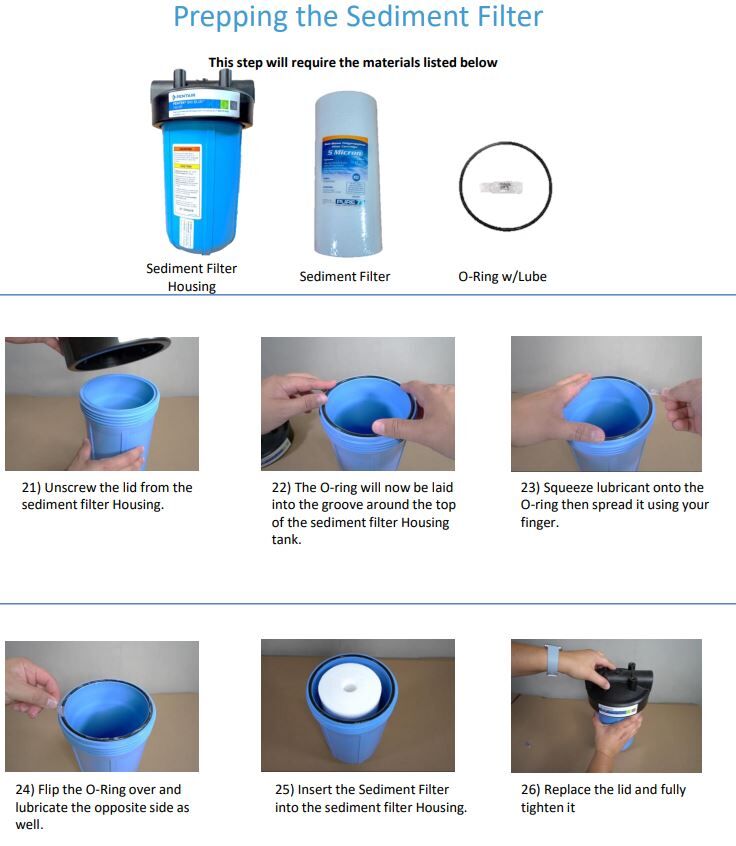
Sediment Pre-Filter Setup.
- Pull the cover off the housing.
- Get the O-ring nice and oiled up, and then drop it into the notch.
- The filter cartridge must be placed within the housing.
- Put a new lid on the housing.
- PVC nipples should be attached to the pre-filter housing on both sides. PVC threads should be taped using the plumber’s tape.
- Install the pre-filter and secure the filter housing with the spanner wrench.
- Join the pre-inlet filters to the main water line. You can use corrugated pipes, PVC nipples, and threaded adapters to make a variety of connections. Wrap the threads in the plumber’s tape.
Tank Installation
- Join the pre-outlet filters to the filter tank’s inlet, and the filter tank’s output to the water main. The use of corrugated pipes, PVC nipples, threaded adapters, and shutoff valves are strongly recommended. Wrap the threads in the plumber’s tape.
Examination of the Filtering Mechanism
- Turn on the water pressure in the shower.
- Turn on the water supply and bypass the whole-house filter. Ensure there are no air gaps.
- Turn the bypass valve to the “open” position. Run some water through the tank to look for leaks.
- If you have 5-10 minutes, please let the system flush.
How To Change Springwell Water Filter?
- Stop the flow of air into or out of the system by sealing up the access points.
- Set a bucket under the filter housing to catch the liquid as it drains.
- Using a filter wrench, unscrew the bowl by turning it anticlockwise (to the left).
- You should reuse the cartridge even though it is now empty. The contents of the filter container need to be dumped into the bucket.
- Take off the O-rings and wipe off any grease or oil. placed aside for future study. A damaged O-ring should be replaced immediately or thrown away.
- Mix in 1 tablespoon (30 milliliters) of bleach in the bowl that is currently only halfway full. Use a nonabrasive sponge or towel to clean away any bacteria, rust, or scale accumulation, and then rinse completely.
- Inspect the O-ring grooved seat and clean it if necessary.
- Take the cartridge out of its packaging and place it in the basin, post-side up.
- The O-ring, previously greased with petroleum jelly, should be inserted into the groove. Check the O-ring and make sure it was put in straight and square.
- Make sure the cartridge is centered on the post in the filter head by turning the bowl anticlockwise with a screwdriver. Try to avoid over-tightening the screws.
- Press and hold the red pressure-relief button as water continues to enter the housing, then gradually release the inlet valve. And if it doesn’t work, try again. Carefully release any trapped air by opening the outlet valve.
- To prepare the system for use, it is recommended to run several cycles of water through it.
- Verify that there are no drippings.
How To Install Springwell Water Softener?
Installation of water softener
- Home water supplies should be turned off.
- Put in water shutoff valves at both ends of the main line.
- You can use PVC nipples and corrugated pipes to bring water to the water softener.
- You’ll need to unscrew the blue tab from the drain valve to get rid of it.
- It’s time to take out the plug that stops the water from draining.
- Connect the hose clamp to the drain line by sliding it over the pipe.
- To drain water, a hose must be attached from the drain valve’s barbed end to the drain line. Clamp it down and make it snug.
- To prevent water from escaping, press the blue tab to secure the drain valve.
- Assure that the drain line’s other end is fastened to the drain.
- To secure the pre-filter housing, you can use the filter wrench.
- Plug in the power supply for the electronic noggin.
- Take off the top and find the battery connector.
Installation of Brine Tank
- The barbed valve in the brine tank is where the drain hose needs to be attached. You can direct the other individual to the bathroom sink.
- You must take the time to open the brine tank and take off the lid.
- Via the hole in the brine tank, attach the regeneration pipe to the brine well.
- Put back the salt and cover the brine well.
- You should secure the tank cover.
Finally, Testing The System
- Activate every water source simultaneously.
- Turn off the water softener’s bypass and any other valves that may be open.
- First step: activating domestic water supply.
- Be sure there is no dripping coming from the shutoff valve for the water supply.
- When looking for leaks, open the shutoff valve to the water softener bypass.
- Allow the system to run for five to ten minutes with the bypass open to flush out the built-up debris.
- Thereafter, we can turn things down to a more comfortable level.

Frequently Asked Questions
What is the filtration mechanism of the Springwell water system?
To effectively remove specific toxins from your water, Springwell Water Systems’ whole-house filtration systems utilize catalytic coconut shell carbon. Highly absorbent, catalytic carbon is derived from carbon-rich source organic matter like coconut shells or coal.
Should I soak my water filter before installation?
You should soak water filters for around 15 minutes before using them for the first time. After soaking, you should run clean water through the filter a couple of times to remove any remaining carbon dust and other debris. Pre-soaking water filters for at least 10–15 minutes is recommended regardless of brand.
Can I put up a water softener by myself?
Self-installing a water softener helps you to save money and do the job when it’s convenient for you, rather than waiting around for a plumber. A new water softener can be installed in under an hour if the old one is being replaced.
Where should one put up a water softener?
Most households have their water softeners put just before the water heater, close to the main water supply. Although basements are the most typical location, water softeners can also be installed in other areas such as the attic, garage, or even a special closet.
Final Words: how to install springwell water system
The Springwell whole-house water filter is an option that a lot of people take advantage of. Installing the Springwell water filtration system requires the expertise of a trained technician. During the installation process, the pressure of the water system as well as the flow rate can be taken into consideration.
One of the many benefits of using this system is that it needs very little maintenance. The frequency of the sediment filter checkups required of the user will vary depending on the quality of the water.
I hope that now you know: how to install Springwell water system.